Keys
Animating in Spine is done by setting "keys". Keys define the start and end times and values of a transition. For any time between the keys, the value is interpolated. The art of animating a skeleton comes down to the poses defined by the keys and the times for the keys on the timeline.
Animations
Before keys can be set, be sure you are in animate mode and that you have an animation active by setting its visibility dot in the tree view, or by selecting it in the animations view.
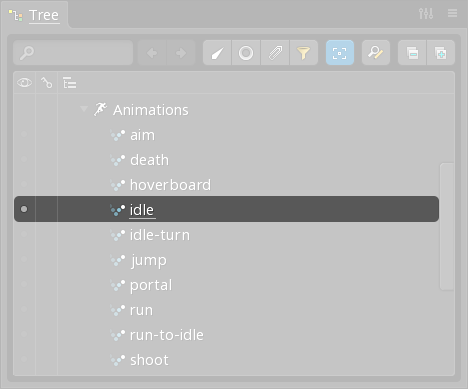
A new animation can be created by selecting the Animations node in the tree and clicking New... Animation.
Folders
Animations can be organized into folders. To create a folder, select an animation and click New... Folder. Animations can be moved between folders by dragging them.
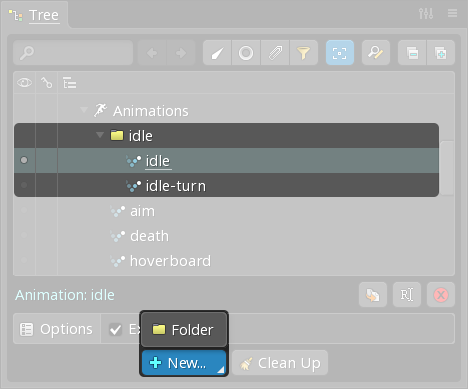
In exported skeleton data, folder names are prepended to the animation name to create the final name used in the Spine Runtimes. For example, if the folder emotes has an animation wave, then the animation name at runtime is emotes/wave.
Timeline
In animate mode, the skeleton's pose comes from the current timeline position and the animation's keys. The timeline is shown on the graph, dopesheet, timeline, and audio views.

If you can't find the key causing the orange vertical line at the end of the animation, likely it is a deform key for a skin attachment or a bone is hidden. Check Show all skin attachments in the tree settings or press ctrl+H (cmd+H on Mac) for Show All Bones/Slots.
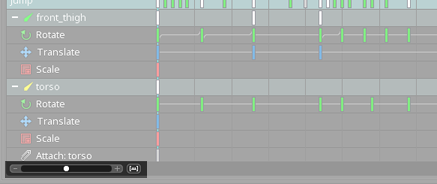
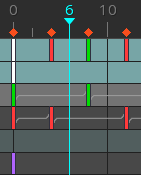
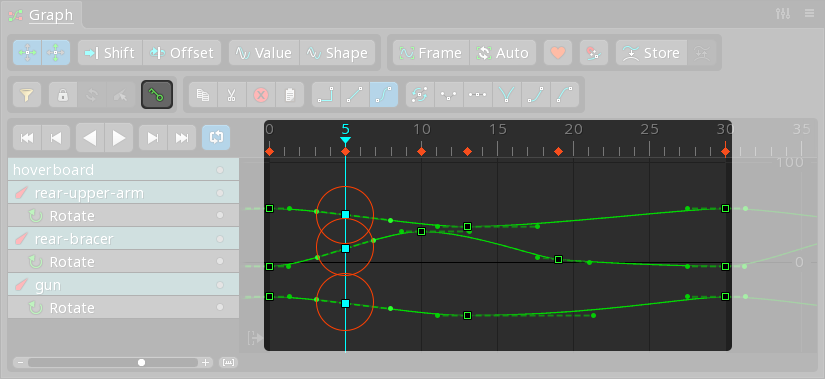
Once keys are set they will appear below the timeline in the graph or dopesheet views. Orange diamonds on the timeline indicate which frames have at least one key. An orange vertical line marks the key with the highest frame, which determines the animation's duration.
Similar to panning in the viewport, dragging with the right mouse button pans the timeline left and right or up and down.
Scrolling the mouse wheel over the timeline zooms the timeline in or out. The zoom slider at the bottom left of the dopesheet indicates the current zoom level and can be dragged. To the right of the zoom slider is the Zoom Keys button that zooms the timeline so all keys are visible.
Timeline position
The timeline position is indicated by a cyan vertical line. The timeline position can be set by left clicking or dragging. Dragging in the timeline is called "scrubbing" and is a quick way to see how the skeleton's pose changes over time. Hold shift to disable frame snapping (see Frames below).
When repeat is enabled and the timeline is scrubbed past the last frame, the position will loop back to the first frame, but only if the scrubbing started before the last frame. This allows scrubbing to be used on a looping animation. If this behavior is not desired then either begin scrubbing after the last frame or disable repeat.
Frames
The timeline is divided into units of time called "frames". Frames make it easier to choose a discrete position in time and to set multiple keys at the exact same time. By default the timeline uses 30 frames per second, but this can be changed in the playback view.
Sometimes an animation looks good on every frame, but during playback the interpolation between frames is undesirable.
Frames exist only for convenience. During playback the timeline position moves between frames (unless interpolation is disabled). Playback can be done at a higher or lower frame rate than the timeline shows.
Frame snapping
Hold shift when clicking or scrubbing the timeline to disable frame snapping and set the timeline position between frames. This allows you to see the animation interpolate smoothly, as it does when played, and to set keys between frames, if needed.
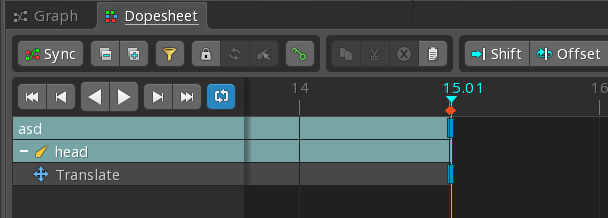
Fractional frames can also be used for a very short transition. For example, a bone could have a translate key on frame 15, then another key on frame 15.01.
Repeat
When disabled, playback continues past the end of the animation.
When enabled, playback starts over at frame 0 when it reaches the the highest frame that has a key. When multiple skeletons have an active animation, the highest frame with a key out of all of them is used.
Repeat is stored per animation, but it is not exported in JSON or binary data.
Setting keys
When unkeyed changes are lost by setting a new timeline position, they can be recovered at the new timeline position using undo. This is helpful if the changes were initially made on the wrong frame.
If there is a change to redo when the timeline position changed, then the pose cannot be recovered this way.
When auto key is not enabled and changes are made to a skeleton in animate mode, they are not automatically stored in the animation as keys. If the timeline position is changed, the unkeyed changes are lost. To keep the changes, they need to be keyed by clicking the key button for each property that was changed. Alternatively, the Key Edited hotkey can be used to key all changed properties by pressing K on your keyboard.
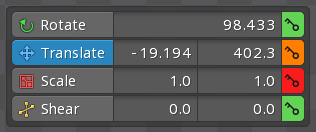
The color of a property's key button is green if there is no key at the current frame, orange if a change has been made but not yet keyed, and red if there is a key at the current frame for that property.
Auto key
When Auto Key is enabled on the main toolbar, a key will be set automatically any time a change is made. This is very convenient and it is common to have auto key enabled all the time. However, care must be taken not to accidentally create unwanted keys.

Key shown
The Key Shown button on the graph and dopesheet toolbars sets keys for all the curves shown in the graph or all the rows shown in the dopesheet. This can also be done using the hotkey ctrl+shift+L (cmd+shift+L on Mac).
Keying all the properties that already have keys results in keys that make up the current pose. This is very useful because those keys can then be moved to another frame to achieve the same pose there.
Keyable properties
The following sections list all the properties that can be keyed in Spine and where to find the key buttons.
Bone transforms
When typing a rotation value larger than 360 degrees, make sure the Local or Parent axes are selected. When World is selected, you are setting the world direction that the bone points, so rotation is limited to 0-360.
A key for rotation, translation, scale, or shear is set by clicking the key button next to the numeric input for the respective tool in the main toolbar.
Additionally, when a bone has any unkeyed changes for rotation, translation, scale, or shear then an orange key button appears next to the bone in the tree. Clicking this button creates a key for the unkeyed transform changes.

Rotation, scale, and shear key values are stored using Local axes. Translation key values are stored using Parent axes.
Setup pose
Unlike other types of keys, the key values for bone transforms are stored relative to the setup pose. If the setup pose is changed, the bone transforms in animation poses will also change.
Separate X and Y
By default, each translate, scale, and shear key for a bone sets both X and Y. This is sufficient for many animations and reduces the number of timelines shown in the dopesheet and graph. It is also slightly more efficient, as there are fewer timelines that need to be applied at runtime.
For animations that need it, X and Y can be keyed separately by checking the Separate checkbox for a bone in the tree properties. Once separated, X and Y for the bone will show up separately in the graph and dopesheet for the current animation.

Transform inheritance
To key the transform inheritance, click the key button next to inherit in the tree.
Slot attachment
Visibility dots in the tree for bones and slots are only for hiding the bones and slots in the editor to reduce clutter. Hiding bones and slots is not keyable and does not affect exported data.
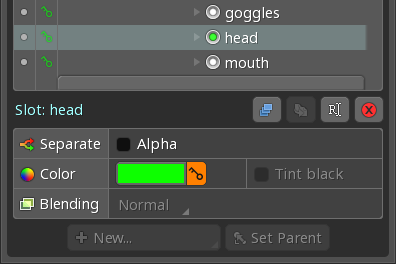
To set which attachment is visible for a slot, click the visibility dot to hide or show the desired attachment in the tree. To key the slot's attachment visibility, click the key button next to the slot in the tree, shown orange here:

Frame-by-frame animation can be achieved by keying the slot attachment so a different image is shown every few frames. See the frame-by-frame demo or example projects for usage examples. Starting with Spine 4.1, region and mesh attachments have a Sequence checkbox for easier frame-by-frame animation.
Slot color
To key the slot color, click the key button next to color button in the tree.
Separate color and alpha
By default, each color key for a slot sets both color (RGB) and alpha (A). This is sufficient for many animations and reduces the number of timelines shown in the dopesheet and graph. It is also slightly more efficient, as there are fewer timelines that need to be applied at runtime.
For animations that need it, color and alpha can be keyed separately by checking the Separate checkbox for a slot in the tree properties.

Once separated, color (RGB) and alpha (A) timelines for the slot are shown separately in the graph and dopesheet for the current animation. Also, two color buttons appear for the slot color. The left button shows the color with alpha and allows the alpha to be keyed. The right button shows the opaque color and allows the color to be keyed. Clicking either button opens the same slot color dialog which can change either the alpha, color, or both.

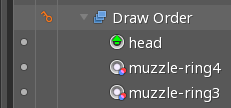
Draw order
The key button next to the Draw Order node in the tree will set a key for the current draw order. See draw order for more information.
Events
The key buttons for setting event keys are next to each event in the tree. The event's integer, float, string, volume, and balance properties are keyed together.

The event's properties can be changed before setting a key. This can reduce the number of events needed. For example, you could have a single particles event and use the string value of each key for the name of the particles to show at runtime.
Sequence keys
To set a sequence key for the region or mesh attachment, click the key button next to the sequence field in the attachment properties in the tree.
Sequence options include:
Holdholds the current frame.Onceplays the sequence once.Loopplays the sequence on a loop.Pingpongplays the sequence until the end, then plays it in reverse.Once reverseplays the sequence once in reverse.Loop reverseplays the sequence on a loop in reverse.Pingpong reverseplays the sequence in reverse until the beginning, then plays it forward until the end.FPSsets the Frames Per Second at which to change to the next attachment.Framesets the current frame to display of the sequence.
See sequence for more information.
Deform keys
Setting a deform key is known in Spine as "keying deformation". In other software it is sometimes called "free form deformation".
To set a deform key for the vertex positions of a mesh, path, bounding box, or clipping attachment, click the key button next to attachment in the tree.

Generally weights should be preferred and deform keys used only sparingly for these reasons:
- Keying bones to deform using weights requires very little animation data.
- Deform keys can significantly increase the size of the animation data, especially when combined with weights. Each deform key stores a vertex position for every bone that affects each vertex (which is the number of vertex transforms the attachment requires). This is especially a problem if prune is not used.
- While both deform keys and weights can be used for linked meshes, bones animated for weights can also be used for any other attachments.
- All vertices for an attachment are keyed together. This can make it difficult to animate different parts of the same attachment using deformation, requiring the deform keys to be set using straight ahead.
- If a mesh needs more vertices added later, the new vertices will not be deformed. Every deform key will need to be visited and the new vertices moved. When using weights, no extra effort is needed to add new vertices.
- While vertices can be rotated with the
Rotatetool, interpolation between deform keys translates vertices in a straight line from one key to the next. - When keying deform, it is not clear what the key does. When keying bones to deform a mesh via weights, the bones have names and it's easier to understand what the keys are doing.
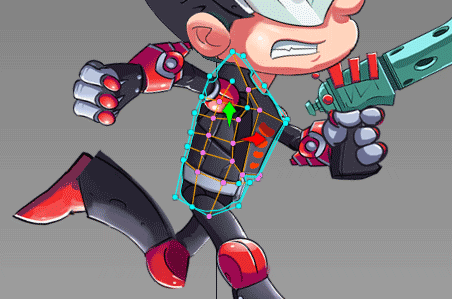
Deform highlight
In animate mode, individual vertices that have been translated are shown in pink. Hold ctrl and double click a vertex to select all the deformed or undeformed vertices.
IK constraints
To set a key for an IK constraint, click the key button next to the IK constraint in the tree. The IK constraint's mix, softness, bend direction, compress, and stretch properties are keyed together.

Transform constraints
To set a key for a transform constraint, click the key button next to the transform constraint in the tree. The transform constraints's rotate, X, Y, scale X, scale Y, and shear Y mixes are key together.
![]()
Path constraints
To set a key for a path constraint, click the key button next to spacing, position, or mixes for the path constraint in the tree properties. When keying the path constraint's mixes, the rotate and translate mixes are keyed together.

When keying a path's position for a path that is not closed, sometimes it is desired to change the position from 0 to 100, then immediately from 0 to 100 again. This can be done using fractional frames. For example, set keys at frames 0, 30, 30.01, and 60 for positions 0, 100, 0, and 100.
Manipulating keys
The dopesheet and graph views provide toolbar buttons to manipulate keys.
Clipboard buttons
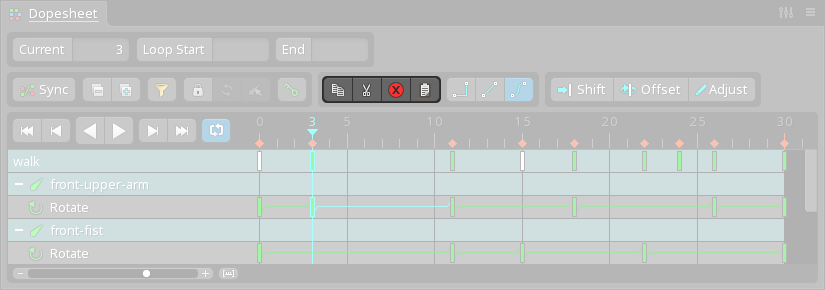
From left to right:
CopyCopies the selected keys to the clipboard. Copy can also be performed by pressingctrl+C(cmd+Con Mac).CutCopies the selected keys to the clipboard and deletes them. Cut can also be performed by pressingctrl+X(cmd+Xon Mac).DeleteDeletes the selected keys. Delete can also be performed by pressingDeleteon the keyboard or by double clicking a key.PastePastes the last copied keys at the current timeline position. Paste can also be performed by pressingctrl+V(cmd+Von Mac).
Bone transform, color, slot attachment, and deform keys can be pasted to a different bone, slot, or attachment by selecting it before pasting.
Shift
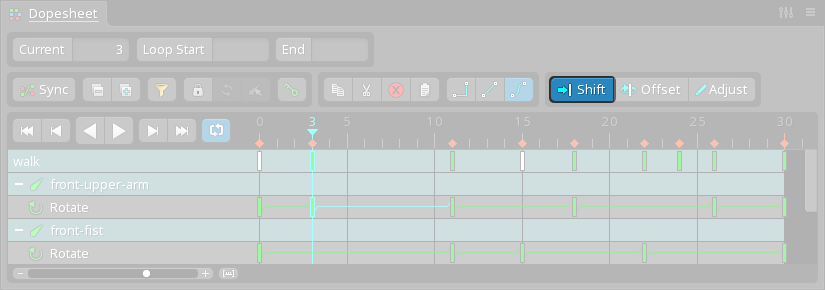
When Shift is enabled and a key is moved, all keys after the moved key are also moved. Shift can also be used by holding alt (option on Mac) while dragging a key. This can be useful when adjusting the timing between keys without affecting the timing of keys after the key that is moved.
Offset
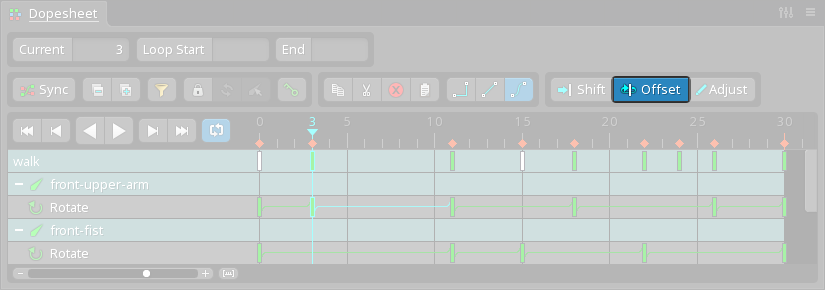
The Offset button is used to move keys for looping animations, wrapping the keys back to the start if they pass the end of the animation. This makes it easy to adjust follow through and overlapping action, which are important principles that make animations look natural.
When enabled and keys are moved past the end or beginning of the animation, the keys will wrap to stay within the animation's duration. Also, keys are set at the beginning and end of the animation to keep the looped movement.
Offset can also be activated by holding ctrl+alt (cmd+alt on Mac) while dragging keys in the dopesheet or graph.
To use Offset, the first and last keys must be the same. This is almost always already the case for looping animations.
When Offset is used, it creates a new key where the animation loops. If the same keys are moved again, the original keys are remembered and offsetting is done again without creating a second new key. However, once other keys are selected then the original keys are forgotten and using Offset again will cause a second new key to be created.
Loop can be used to control the start and end frames used for Offset, otherwise frame 0 and the highest frame for the animation are used.
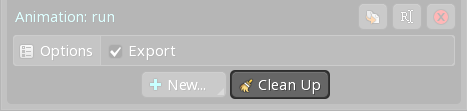
Clean Up
Multiple animations can be selected in the tree and Clean Up will process all of them at once.
The Clean Up button in the tree properties for an animation deletes all unnecessary keys. These are keys which can be safely deleted without affecting the poses in the animation. This includes keying the same value multiple times in a row, keying the same values as the setup pose, and many other scenarios.
Often it is convenient to set keys liberally when designing an animation, then use Clean Up afterward. Having fewer keys makes it easier to work on an animation and reduces the size of the exported animation data, especially when deform keys are removed. Also, fewer keys makes applying the animation at runtime use slightly less CPU.
While Clean Up is usually safe to use, there may be some cases where it removes keys that are needed. The most common scenario is when an animation is intended to be applied on a higher AnimationState track. In that case, keys may be needed to override animations from lower tracks. When an animation has Layered checked then Clean Up will not remove those keys.
There may be other, rare scenarios such as when AnimationState is not used at runtime or if runtime code is used to find a key and change its value. In those cases it may be better to not use Clean Up.
Hands on
Now is a great time to explore firsthand how keying works in Spine. If you haven't yet set up your own skeleton, you can open one of the example projects and create a new animation by clicking the Animations node in the tree, then New... Animation. In animate mode, pose the skeleton at frame 0 and set keys (for example, by pressing K or enabling auto key). Next, click frame 30, pose the skeleton differently, and set keys. Scrub the timeline by dragging or click play to see your animation in action.
Video
Part 1:
Part 2: